
Preface
This tutorial explains how Thymeleaf can be integrated with the Spring Framework, especially (but not only) Spring MVC.
Note that Thymeleaf has integrations for both versions 3.x and 4.x of the Spring Framework, provided by two separate libraries called thymeleaf-spring3 and thymeleaf-spring4. These libraries are packaged in separate .jar files (thymeleaf-spring3-{version}.jar and thymeleaf-spring4-{version}.jar) and need to be added to your classpath in order to use Thymeleaf’s Spring integrations in your application.
The code samples and example application in this tutorial make use of Spring 4.x and its corresponding Thymeleaf integrations, but the contents of this text are valid also for Spring 3.x. If your application uses Spring 3.x, all you have to do is replace the org.thymeleaf.spring4 package with org.thymeleaf.spring3 in the code samples.
1 Integrating Thymeleaf with Spring
Thymeleaf offers a set of Spring integrations that allow you to use it as a full-featured substitute for JSP in Spring MVC applications.
These integrations will allow you to:
- Make the mapped methods in your Spring MVC
@Controllerobjects forward to templates managed by Thymeleaf, exactly like you do with JSPs. - Use Spring Expression Language (Spring EL) instead of OGNL in your templates.
- Create forms in your templates that are completely integrated with your form-backing beans and result bindings, including the use of property editors, conversion services and validation error handling.
- Display internationalization messages from messages files managed by Spring (through the usual
MessageSourceobjects).
Note that in order to fully understand this tutorial, you should have first gone through the “Using Thymeleaf” tutorial, which explains the Standard Dialect in depth.
2 The SpringStandard Dialect
In order to achieve an easier and better integration, Thymeleaf provides a dialect which specifically implements all the needed features for it to work correctly with Spring.
This specific dialect is based on the Thymeleaf Standard Dialect and is implemented in a class called org.thymeleaf.spring4.dialect.SpringStandardDialect, which in fact extends from org.thymeleaf.standard.StandardDialect.
Besides all the features already present in the Standard Dialect – and therefore inherited –, the SpringStandard Dialect introduces the following specific features:
- Use Spring Expression Language (Spring EL) as a variable expression language, instead of OGNL. Consequently, all
${...}and*{...}expressions will be evaluated by Spring’s Expression Language engine. - Access any beans in your application context using SpringEL’s syntax:
${@myBean.doSomething()} - New attributes for form processing:
th:field,th:errorsandth:errorclass, besides a new implementation ofth:objectthat allows it to be used for form command selection. - An expression object and method,
#themes.code(...), which is equivalent to thespring:themeJSP custom tag. - An expression object and method,
#mvc.uri(...), which is equivalent to thespring:mvcUrl(...)JSP custom function (only in Spring 4.1+). - New DTDs for validation, including these new attributes, as well as new corresponding DOCTYPE translation rules.
Note that you shouldn’t use this dialect directly in a normal TemplateEngine object as a part of its configuration. Instead, you should instance a new template engine class that performs all the required configuration steps: org.thymeleaf.spring4.SpringTemplateEngine.
An example bean configuration:
<bean id="templateResolver"
       class="org.thymeleaf.templateresolver.ServletContextTemplateResolver">
  <property name="prefix" value="/WEB-INF/templates/" />
  <property name="suffix" value=".html" />
  <property name="templateMode" value="HTML5" />
</bean>

<bean id="templateEngine"
      class="org.thymeleaf.spring4.SpringTemplateEngine">
  <property name="templateResolver" ref="templateResolver" />
</bean>
3 Views and View Resolvers
3.1 Views and View Resolvers in Spring MVC
There are two interfaces in Spring MVC that conform the core of its templating system:
org.springframework.web.servlet.Vieworg.springframework.web.servlet.ViewResolver
Views model pages in our applications and allow us to modify and predefine their behaviour by defining them as beans. Views are in charge of rendering the actual HTML interface, usually by the execution of some template engine like JSP (or Thymeleaf).
ViewResolvers are the objects in charge of obtaining View objects for a specific operation and locale. Typically, controllers ask ViewResolvers to forward to a view with a specific name (a String returned by the controller method), and then all the view resolvers in the application execute in ordered chain until one of them is able to resolve that view, in which case a View object is returned and control is passed to it for the renderization of HTML.
Note that not all pages in our applications have to be defined as Views, but only those which behaviour we wish to be non-standard or configured in a specific way (for example, by wiring some special beans to it. If a ViewResolver is asked a view that has no corresponding bean —which is the common case—, a new View object is created ad hoc and returned.
A typical configuration for a JSP+JSTL ViewResolver in a Spring MVC application looks like this:
<bean class="org.springframework.web.servlet.view.InternalResourceViewResolver">
  <property name="viewClass" value="org.springframework.web.servlet.view.JstlView" />
  <property name="prefix" value="/WEB-INF/jsps/" />
  <property name="suffix" value=".jsp" />
  <property name="order" value="2" />
  <property name="viewNames" value="*jsp" />
</bean>
A quick look at its properties is enough to know about how it’s configured:
viewClassestablishes the class of the View instances. This is needed for a JSP resolver, but it will not be needed at all when we’re working with Thymeleaf.prefixandsuffixwork in a similar way to the attributes of the same names in Thymeleaf’s TemplateResolver objects.orderestablishes the order in which the ViewResolver will be queried in the chain.viewNamesallows the definition (with wildcards) of the view names that will be resolved by this ViewResolver.
3.2 Views and View Resolvers in Thymeleaf
Thymeleaf offers implementations for the two interfaces mentioned above:
org.thymeleaf.spring4.view.ThymeleafVieworg.thymeleaf.spring4.view.ThymeleafViewResolver
These two classes will be in charge of processing Thymeleaf templates as a result of the execution of controllers.
Configuration of the Thymeleaf View Resolver is very similar to that of JSP’s:
<bean class="org.thymeleaf.spring4.view.ThymeleafViewResolver">
  <property name="templateEngine" ref="templateEngine" />
  <property name="order" value="1" />
  <property name="viewNames" value="*.html,*.xhtml" />
</bean>
The templateEngine parameter is, of course, the SpringTemplateEngine object we defined in the previous chapter. The other two (order and viewNames) are both optional, and have the same meaning as in the JSP ViewResolver we saw before.
Note that we do not need prefix or suffix parameters, because these are already specified at the Template Resolver (which in turn is passed to the Template Engine).
And what if we wanted to define a View bean and add some static variables to it? Easy:
<bean name="main" class="org.thymeleaf.spring4.view.ThymeleafView">
<property name="staticVariables">
<map>
<entry key="footer" value="Some company: <b>ACME</b>" />
</map>
</property>
</bean>4 Template Resolution
4.1 Spring-based Template Resolution
When used with Spring, Thymeleaf provides additional implementations of ITemplateResolver and an associated IResourceResolver, fully integrated with Spring’s resource resolution mechanism. These are:
org.thymeleaf.spring4.templateresolver.SpringResourceTemplateResolverfor resolving templates.org.thymeleaf.spring4.resourceresolver.SpringResourceResourceResolver, mostly for internal use.
This template resolver will allow applications to resolve templates using the standard Spring resource resolution syntax. It can be configured like:
<bean id="templateResolver"
      class="org.thymeleaf.spring4.templateresolver.SpringResourceTemplateResolver">
  <property name="suffix" value=".html" />
  <property name="templateMode" value="HTML5" />
</bean>
And this will allow you to use view names like:
@RequestMapping("/doit")
public String doIt() {
    ...
    return "classpath:resources/templates/doit";
}
Note that this Spring-based resource resolver will never be used by default. It will just be an option available for applications to configure in addition to the other template resolver implementations offered by the Thymeleaf core.
5 Spring Thyme Seed Starter Manager
The source code for the examples shown in this and future chapters of this guide can be found in the Spring Thyme Seed Starter Manager GitHub repository.
5.1 The Concept
At Thymeleaf we’re huge fans of thyme, and every spring we prepare our seed starting kits with good soil and our favourite seeds, place them under the Spanish sun and patiently wait for our new plants to grow.
But this year we got fed up with sticking labels to the seed starter containers for knowing which seed was in each cell of the container, so we decided to prepare an application using Spring MVC and Thymeleaf to help us catalogue our starters: The Spring Thyme SeedStarter Manager.
In a similar way to the Good Thymes Virtual Grocery application we developed in the Using Thymeleaf tutorial, the STSM will allow us to exemplify the most important aspects of the integration of Thymeleaf as a template engine for Spring MVC.
5.2 Business Layer
We will need a very simple business layer for our application. First of all, let’s have a look at our model entities:
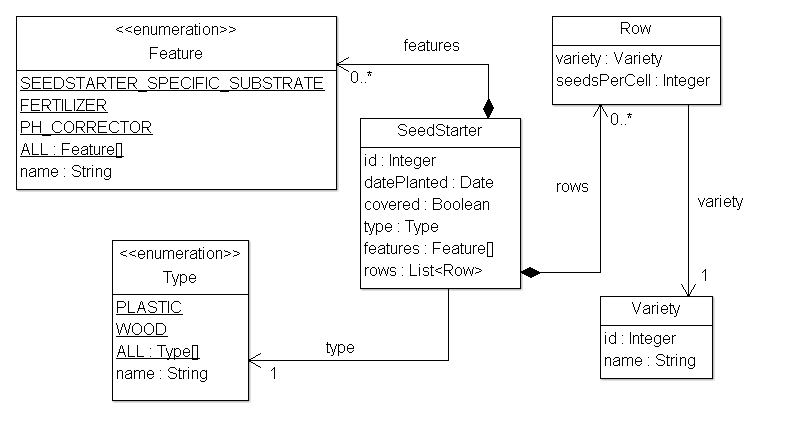
A couple of very simple service classes will provide the required business methods. Like:
@Service
public class SeedStarterService {

    @Autowired
    private SeedStarterRepository seedstarterRepository;

    public List<SeedStarter> findAll() {
        return this.seedstarterRepository.findAll();
    }

    public void add(final SeedStarter seedStarter) {
        this.seedstarterRepository.add(seedStarter);
    }

}
And:
@Service
public class VarietyService {

    @Autowired
    private VarietyRepository varietyRepository;

    public List<Variety> findAll() {
        return this.varietyRepository.findAll();
    }

    public Variety findById(final Integer id) {
        return this.varietyRepository.findById(id);
    }

}
5.3 Spring MVC configuration
Next we need to set up the Spring MVC configuration for the application, which will include not only the standard Spring MVC artifacts like resource handling or annotation scanning, but also the creation of the Template Engine and View Resolver instances.
<?xml version="1.0" encoding="UTF-8"?>
<beans xmlns="http://www.springframework.org/schema/beans"
       xmlns:xsi="http://www.w3.org/2001/XMLSchema-instance"
       xmlns:mvc="http://www.springframework.org/schema/mvc"
       xmlns:context="http://www.springframework.org/schema/context"
       xsi:schemaLocation="http://www.springframework.org/schema/mvc
                           http://www.springframework.org/schema/mvc/spring-mvc-3.0.xsd
                           http://www.springframework.org/schema/beans
                           http://www.springframework.org/schema/beans/spring-beans-3.0.xsd
                           http://www.springframework.org/schema/context
                           http://www.springframework.org/schema/context/spring-context-3.0.xsd">


  <!-- **************************************************************** -->
  <!--  RESOURCE FOLDERS CONFIGURATION                                  -->
  <!--  Dispatcher configuration for serving static resources           -->
  <!-- **************************************************************** -->
  <mvc:resources location="/images/" mapping="/images/**" />
  <mvc:resources location="/css/" mapping="/css/**" />


  <!-- **************************************************************** -->
  <!--  SPRING ANNOTATION PROCESSING                                    -->
  <!-- **************************************************************** -->
  <mvc:annotation-driven conversion-service="conversionService" />
  <context:component-scan base-package="thymeleafexamples.stsm" />


  <!-- **************************************************************** -->
  <!--  MESSAGE EXTERNALIZATION/INTERNATIONALIZATION                    -->
  <!--  Standard Spring MessageSource implementation                    -->
  <!-- **************************************************************** -->
  <bean id="messageSource" class="org.springframework.context.support.ResourceBundleMessageSource">
    <property name="basename" value="Messages" />
  </bean>


  <!-- **************************************************************** -->
  <!--  CONVERSION SERVICE                                              -->
  <!--  Standard Spring formatting-enabled implementation               -->
  <!-- **************************************************************** -->
  <bean id="conversionService"
        class="org.springframework.format.support.FormattingConversionServiceFactoryBean">
    <property name="formatters">
      <set>
        <bean class="thymeleafexamples.stsm.web.conversion.VarietyFormatter" />
        <bean class="thymeleafexamples.stsm.web.conversion.DateFormatter" />
      </set>
    </property>
  </bean>


  <!-- **************************************************************** -->
  <!--  THYMELEAF-SPECIFIC ARTIFACTS                                    -->
  <!--  TemplateResolver <- TemplateEngine <- ViewResolver              -->
  <!-- **************************************************************** -->

  <bean id="templateResolver"
        class="org.thymeleaf.templateresolver.ServletContextTemplateResolver">
    <property name="prefix" value="/WEB-INF/templates/" />
    <property name="suffix" value=".html" />
    <property name="templateMode" value="HTML5" />
  </bean>

  <bean id="templateEngine"
        class="org.thymeleaf.spring4.SpringTemplateEngine">
    <property name="templateResolver" ref="templateResolver" />
  </bean>

  <bean class="org.thymeleaf.spring4.view.ThymeleafViewResolver">
    <property name="templateEngine" ref="templateEngine" />
  </bean>


</beans>
Important: Note that we have selected HTML5 as a template mode.
5.4 The Controller
Of course, we will also need a controller for our application. As the STSM will only contain one web page with a list of seed starters and a form for adding new ones, we will write only one controller class for all the server interactions:
@Controller
public class SeedStarterMngController {

    @Autowired
    private VarietyService varietyService;

    @Autowired
    private SeedStarterService seedStarterService;

    ...

}
Now let’s see what we can add to this controller class.
Model Attributes
First we will add some model attributes that we will need in the page:
@ModelAttribute("allTypes")
public List<Type> populateTypes() {
    return Arrays.asList(Type.ALL);
}

@ModelAttribute("allFeatures")
public List<Feature> populateFeatures() {
    return Arrays.asList(Feature.ALL);
}

@ModelAttribute("allVarieties")
public List<Variety> populateVarieties() {
    return this.varietyService.findAll();
}

@ModelAttribute("allSeedStarters")
public List<SeedStarter> populateSeedStarters() {
    return this.seedStarterService.findAll();
}
Mapped methods
And now the most important part of a controller, the mapped methods: one for showing the form page, and other for processing the addition of new Seed Starter objects.
@RequestMapping({"/","/seedstartermng"})
public String showSeedstarters(final SeedStarter seedStarter) {
    seedStarter.setDatePlanted(Calendar.getInstance().getTime());
    return "seedstartermng";
}

@RequestMapping(value="/seedstartermng", params={"save"})
public String saveSeedstarter(
        final SeedStarter seedStarter, final BindingResult bindingResult, final ModelMap model) {
    if (bindingResult.hasErrors()) {
        return "seedstartermng";
    }
    this.seedStarterService.add(seedStarter);
    model.clear();
    return "redirect:/seedstartermng";
}
5.5 Configuring a Conversion Service
In order to allow easy formatting of Date and also Variety objects in our view layer, we registered a Spring ConversionService implementation at the application context. See it again:
<?xml version="1.0" encoding="UTF-8"?>
<beans ...>

  ...
  <mvc:annotation-driven conversion-service="conversionService" />
  ...

  <!-- **************************************************************** -->
  <!--  CONVERSION SERVICE                                              -->
  <!--  Standard Spring formatting-enabled implementation               -->
  <!-- **************************************************************** -->
  <bean id="conversionService"
        class="org.springframework.format.support.FormattingConversionServiceFactoryBean">
    <property name="formatters">
      <set>
        <bean class="thymeleafexamples.stsm.web.conversion.VarietyFormatter" />
        <bean class="thymeleafexamples.stsm.web.conversion.DateFormatter" />
      </set>
    </property>
  </bean>

  ...

</beans>
That conversion service allowed us to register two Spring formatters, implementations of the org.springframework.format.Formatter interface. For more information on how the Spring conversion infrastructure works, see the docs at spring.io.
Let’s have a look at the DateFormatter, which formats dates according to a format string present at the date.format message key of our Messages.properties:
public class DateFormatter implements Formatter<Date> {

    @Autowired
    private MessageSource messageSource;


    public DateFormatter() {
        super();
    }

    public Date parse(final String text, final Locale locale) throws ParseException {
        final SimpleDateFormat dateFormat = createDateFormat(locale);
        return dateFormat.parse(text);
    }

    public String print(final Date object, final Locale locale) {
        final SimpleDateFormat dateFormat = createDateFormat(locale);
        return dateFormat.format(object);
    }

    private SimpleDateFormat createDateFormat(final Locale locale) {
        final String format = this.messageSource.getMessage("date.format", null, locale);
        final SimpleDateFormat dateFormat = new SimpleDateFormat(format);
        dateFormat.setLenient(false);
        return dateFormat;
    }

}
The VarietyFormatter automatically converts between our Variety entities and the way we want to use them in our forms (basically, by their id field values):
public class VarietyFormatter implements Formatter<Variety> {

    @Autowired
    private VarietyService varietyService;


    public VarietyFormatter() {
        super();
    }

    public Variety parse(final String text, final Locale locale) throws ParseException {
        final Integer varietyId = Integer.valueOf(text);
        return this.varietyService.findById(varietyId);
    }


    public String print(final Variety object, final Locale locale) {
        return (object != null ? object.getId().toString() : "");
    }

}
We will learn more on how these formatters affect the way our data is displayed later on.
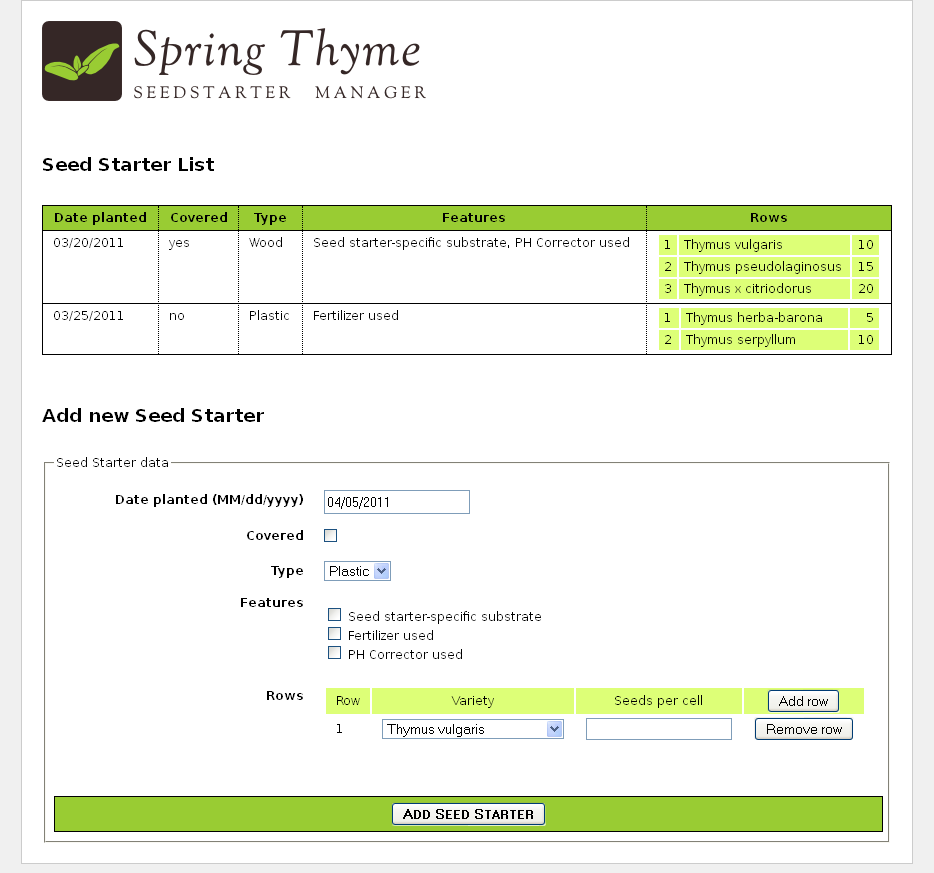
6 Listing Seed Starter Data
The first thing that our /WEB-INF/templates/seedstartermng.html page will show is a listing with the seed starters currently stored. For this we will need some externalized messages and also some expression evaluation on model attributes. Like this:
<div class="seedstarterlist" th:unless="${#lists.isEmpty(allSeedStarters)}">

  <h2 th:text="#{title.list}">List of Seed Starters</h2>

  <table>
    <thead>
      <tr>
        <th th:text="#{seedstarter.datePlanted}">Date Planted</th>
        <th th:text="#{seedstarter.covered}">Covered</th>
        <th th:text="#{seedstarter.type}">Type</th>
        <th th:text="#{seedstarter.features}">Features</th>
        <th th:text="#{seedstarter.rows}">Rows</th>
      </tr>
    </thead>
    <tbody>
      <tr th:each="sb : ${allSeedStarters}">
        <td th:text="${{sb.datePlanted}}">13/01/2011</td>
        <td th:text="${sb.covered}? #{bool.true} : #{bool.false}">yes</td>
        <td th:text="#{${'seedstarter.type.' + sb.type}}">Wireframe</td>
        <td th:text="${#strings.arrayJoin(
                           #messages.arrayMsg(
                               #strings.arrayPrepend(sb.features,'seedstarter.feature.')),
                           ', ')}">Electric Heating, Turf</td>
        <td>
          <table>
            <tbody>
              <tr th:each="row,rowStat : ${sb.rows}">
                <td th:text="${rowStat.count}">1</td>
                <td th:text="${row.variety.name}">Thymus Thymi</td>
                <td th:text="${row.seedsPerCell}">12</td>
              </tr>
            </tbody>
          </table>
        </td>
      </tr>
    </tbody>
  </table>
</div>
Lots to see here. Let’s have a look at each fragment separately.
First of all, this section will only be shown if there are any seed starters. We achieve that with a th:unless attribute and the #lists.isEmpty(...) function.
<div class="seedstarterlist" th:unless="${#lists.isEmpty(allSeedStarters)}">Note that all utility objects like #lists are available in Spring EL expressions just as they were in OGNL expressions in the Standard Dialect.
The next thing to see is a lot of internationalized (externalized) texts, like:
<h2 th:text="#{title.list}">List of Seed Starters</h2>

<table>
  <thead>
    <tr>
      <th th:text="#{seedstarter.datePlanted}">Date Planted</th>
      <th th:text="#{seedstarter.covered}">Covered</th>
      <th th:text="#{seedstarter.type}">Type</th>
      <th th:text="#{seedstarter.features}">Features</th>
      <th th:text="#{seedstarter.rows}">Rows</th>
      ...
This being a Spring MVC application, we already defined a MessageSource bean in our spring XML configuration (MessageSource objects are the standard way of managing externalized texts in Spring MVC):
<bean id="messageSource" class="org.springframework.context.support.ResourceBundleMessageSource">
  <property name="basename" value="Messages" />
</bean>
…and that basename property indicates that we will have files like Messages_es.properties or Messages_en.properties in our classpath. Let’s have a look at the Spanish version:
title.list=Lista de semilleros

date.format=dd/MM/yyyy
bool.true=sí
bool.false=no

seedstarter.datePlanted=Fecha de plantación
seedstarter.covered=Cubierto
seedstarter.type=Tipo
seedstarter.features=Características
seedstarter.rows=Filas

seedstarter.type.WOOD=Madera
seedstarter.type.PLASTIC=Plástico

seedstarter.feature.SEEDSTARTER_SPECIFIC_SUBSTRATE=Sustrato específico para semilleros
seedstarter.feature.FERTILIZER=Fertilizante
seedstarter.feature.PH_CORRECTOR=Corrector de PH
In the first column of the table listing we will show the date when the seed starter was prepared. But we will show it formatted in the way we defined in our DateFormatter. In order to do that we will use the double-bracket syntax, which will automatically apply the Spring Conversion Service.
<td th:text="${{sb.datePlanted}}">13/01/2011</td>Next is showing whether the seed starter container is covered or not, by transforming the value of the boolean covered bean property into an internationalized “yes” or “no” with a conditional expression:
<td th:text="${sb.covered}? #{bool.true} : #{bool.false}">yes</td>Now we have to show the type of seed starter container. Type is a java enum with two values (WOOD and PLASTIC), and that’s why we defined two properties in our Messages file called seedstarter.type.WOOD and seedstarter.type.PLASTIC.
But in order to obtain the internationalized names of the types, we will need to add the seedstarter.type. prefix to the enum value by means of an expression, which result we will then use as the message key:
<td th:text="#{${'seedstarter.type.' + sb.type}}">Wireframe</td>The most difficult part of this listing is the features column. In it we want to display all the features of our container —that come in the form of an array of Feature enums—, separated by commas. Like “Electric Heating, Turf”.
Note that this is particularly difficult because these enum values also need to be externalized, as we did with Types. The flow is then:
- Prepend the corresponding prefix to all the elements of the
featuresarray. - Obtain the externalized messages corresponding to all the keys from step 1.
- Join all the messages obtained in step 2, using a comma as a delimiter.
For achieving this, we create the following code:
<td th:text="${#strings.arrayJoin(
                   #messages.arrayMsg(
                       #strings.arrayPrepend(sb.features,'seedstarter.feature.')),
                   ', ')}">Electric Heating, Turf</td>
The last column of our listing will be quite simple, in fact. Even if it has a nested table for showing the contents of each row in the container:
<td>
  <table>
    <tbody>
      <tr th:each="row,rowStat : ${sb.rows}">
        <td th:text="${rowStat.count}">1</td>
        <td th:text="${row.variety.name}">Thymus Thymi</td>
        <td th:text="${row.seedsPerCell}">12</td>
      </tr>
    </tbody>
  </table>
</td>
7 Creating a Form
7.1 Handling the command object
Command object is the name Spring MVC gives to form-backing beans, this is, to objects that model a form’s fields and provide getter and setter methods that will be used by the framework for establishing and obtaining the values input by the user at the browser side.
Thymeleaf requires you to specify the command object by using a th:object attribute in your <form> tag:
<form action="#" th:action="@{/seedstartermng}" th:object="${seedStarter}" method="post">
    ...
</form>
This is consistent with other uses of th:object, but in fact this specific scenario adds some limitations in order to correctly integrate with Spring MVC’s infrastructure:
- Values for
th:objectattributes in form tags must be variable expressions (${...}) specifying only the name of a model attribute, without property navigation. This means that an expression like${seedStarter}is valid, but${seedStarter.data}would not be. - Once inside the
<form>tag, no otherth:objectattribute can be specified. This is consistent with the fact that HTML forms cannot be nested.
7.2 Inputs
Let’s see now how to add an input to our form:
<input type="text" th:field="*{datePlanted}" />As you can see, we are introducing a new attribute here: th:field. This is a very important feature for Spring MVC integration because it does all the heavy work of binding your input with a property in the form-backing bean. You can see it as an equivalent of the path attribute in a
The th:field attribute behaves differently depending on whether it is attached to an <input>, <select> or <textarea> tag (and also depending on the specific type of <input> tag). In this case (input[type=text]), the above line of code is similar to:
<input type="text" id="datePlanted" name="datePlanted" th:value="*{datePlanted}" />…but in fact it is a little bit more than that, because th:field will also apply the registered Spring Conversion Service, including the DateFormatter we saw before (even if the field expression is not double-bracketed). Thanks to this, the date will be shown correctly formatted.
Values for th:field attributes must be selection expressions (*{...}), which makes sense given the fact that they will be evaluated on the form-backing bean and not on the context variables (or model attributes in Spring MVC jargon).
Contrary to the ones in th:object, these expressions can include property navigation (in fact any expression allowed for the path attribute of a <form:input> JSP tag will be allowed here).
Note that th:field also understands the new types of <input> element introduced by HTML5 like <input type="datetime" ... />, <input type="color" ... />, etc., effectively adding complete HTML5 support to Spring MVC.
7.3 Checkbox fields
th:field also allows us to define checkbox inputs. Let’s see an example from our HTML page:
<div>
  <label th:for="${#ids.next('covered')}" th:text="#{seedstarter.covered}">Covered</label>
  <input type="checkbox" th:field="*{covered}" />
</div>
Note there’s some fine stuff here besides the checkbox itself, like an externalized label and also the use of the #ids.next('covered') function for obtaining the value that will be applied to the id attribute of the checkbox input.
Why do we need this dynamic generation of an id attribute for this field? Because checkboxes are potentially multi-valued, and thus their id values will always be suffixed a sequence number (by internally using the #ids.seq(...) function) in order to ensure that each of the checkbox inputs for the same property has a different id value.
We can see this more easily if we look at such a multi-valued checkbox field:
<ul>
  <li th:each="feat : ${allFeatures}">
    <input type="checkbox" th:field="*{features}" th:value="${feat}" />
    <label th:for="${#ids.prev('features')}"
           th:text="#{${'seedstarter.feature.' + feat}}">Heating</label>
  </li>
</ul>
Note that we’ve added a th:value attribute this time, because the features field is not a boolean like covered was, but instead is an array of values.
Let’s see the HTML output generated by this code:
<ul>
  <li>
    <input id="features1" name="features" type="checkbox" value="SEEDSTARTER_SPECIFIC_SUBSTRATE" />
    <input name="_features" type="hidden" value="on" />
    <label for="features1">Seed starter-specific substrate</label>
  </li>
  <li>
    <input id="features2" name="features" type="checkbox" value="FERTILIZER" />
    <input name="_features" type="hidden" value="on" />
    <label for="features2">Fertilizer used</label>
  </li>
  <li>
    <input id="features3" name="features" type="checkbox" value="PH_CORRECTOR" />
    <input name="_features" type="hidden" value="on" />
    <label for="features3">PH Corrector used</label>
  </li>
</ul>
We can see here how a sequence suffix is added to each input’s id attribute, and how the #ids.prev(...) function allows us to retrieve the last sequence value generated for a specific input id.
Don’t worry about those hidden inputs with
name="_features": they are automatically added in order to avoid problems with browsers not sending unchecked checkbox values to the server upon form submission.
Also note that if our features property contained some selected values in our form-backing bean, th:fieldwould have taken care of that and would have added a checked="checked" attribute to the corresponding input tags.
7.5 Dropdown/List selectors
Select fields have two parts: the <select> tag and its nested <option> tags. When creating this kind of field, only the <select> tag has to include a th:field attribute, but the th:value attributes in the nested <option> tags will be very important because they will provide the means of knowing which is the currently selected option (in a similar way to non-boolean checkboxes and radio buttons).
Let’s re-build the type field as a dropdown select:
<select th:field="*{type}">
  <option th:each="type : ${allTypes}"
          th:value="${type}"
          th:text="#{${'seedstarter.type.' + type}}">Wireframe</option>
</select>
At this point, understanding this piece of code is quite easy. Just notice how attribute precedence allows us to set the th:each attribute in the <option> tag itself.
7.6 Dynamic fields
Thanks to the advanced form-field binding capabilities in Spring MVC, we can use complex Spring EL expressions to bind dynamic form fields to our form-backing bean. This will allow us to create new Row objects in our SeedStarter bean, and to add those rows’ fields to our form at user request.
In order to do this, we will need a couple of new mapped methods in our controller, which will add or remove a row from our SeedStarter depending on the existence of specific request parameters:
@RequestMapping(value="/seedstartermng", params={"addRow"})
public String addRow(final SeedStarter seedStarter, final BindingResult bindingResult) {
    seedStarter.getRows().add(new Row());
    return "seedstartermng";
}

@RequestMapping(value="/seedstartermng", params={"removeRow"})
public String removeRow(
        final SeedStarter seedStarter, final BindingResult bindingResult,
        final HttpServletRequest req) {
    final Integer rowId = Integer.valueOf(req.getParameter("removeRow"));
    seedStarter.getRows().remove(rowId.intValue());
    return "seedstartermng";
}
And now we can add a dynamic table to our form:
<table>
  <thead>
    <tr>
      <th th:text="#{seedstarter.rows.head.rownum}">Row</th>
      <th th:text="#{seedstarter.rows.head.variety}">Variety</th>
      <th th:text="#{seedstarter.rows.head.seedsPerCell}">Seeds per cell</th>
      <th>
        <button type="submit" name="addRow" th:text="#{seedstarter.row.add}">Add row</button>
      </th>
    </tr>
  </thead>
  <tbody>
    <tr th:each="row,rowStat : *{rows}">
      <td th:text="${rowStat.count}">1</td>
      <td>
        <select th:field="*{rows[__${rowStat.index}__].variety}">
          <option th:each="var : ${allVarieties}"
                  th:value="${var.id}"
                  th:text="${var.name}">Thymus Thymi</option>
        </select>
      </td>
      <td>
        <input type="text" th:field="*{rows[__${rowStat.index}__].seedsPerCell}" />
      </td>
      <td>
        <button type="submit" name="removeRow"
                th:value="${rowStat.index}" th:text="#{seedstarter.row.remove}">Remove row</button>
      </td>
    </tr>
  </tbody>
</table>
Quite a lot of things to see here, but not much we should not understand by now… except for one strange thing:
<select th:field="*{rows[__${rowStat.index}__].variety}">

    ...

</select>
If you recall from the “Using Thymeleaf” tutorial, that __${...}__ syntax is a preprocessing expression, which is an inner expression that is evaluated before actually evaluating the whole expression. But why that way of specifying the row index? Wouldn’t it be enough with:
<select th:field="*{rows[rowStat.index].variety}">

    ...

</select>
…well, actually, no. The problem is that Spring EL does not evaluate variables inside array index brackets, so when executing the above expression we would obtain an error telling us that rows[rowStat.index] (instead of rows[0], rows[1], etc) is not a valid position in the rows collection. That’s why preprocessing is needed here.
Let’s have a look at a fragment of the resulting HTML after pressing “Add Row” a couple of times:
<tbody>
  <tr>
    <td>1</td>
    <td>
      <select id="rows0.variety" name="rows[0].variety">
        <option selected="selected" value="1">Thymus vulgaris</option>
        <option value="2">Thymus x citriodorus</option>
        <option value="3">Thymus herba-barona</option>
        <option value="4">Thymus pseudolaginosus</option>
        <option value="5">Thymus serpyllum</option>
      </select>
    </td>
    <td>
      <input id="rows0.seedsPerCell" name="rows[0].seedsPerCell" type="text" value="" />
    </td>
    <td>
      <button name="removeRow" type="submit" value="0">Remove row</button>
    </td>
  </tr>
  <tr>
    <td>2</td>
    <td>
      <select id="rows1.variety" name="rows[1].variety">
        <option selected="selected" value="1">Thymus vulgaris</option>
        <option value="2">Thymus x citriodorus</option>
        <option value="3">Thymus herba-barona</option>
        <option value="4">Thymus pseudolaginosus</option>
        <option value="5">Thymus serpyllum</option>
      </select>
    </td>
    <td>
      <input id="rows1.seedsPerCell" name="rows[1].seedsPerCell" type="text" value="" />
    </td>
    <td>
      <button name="removeRow" type="submit" value="1">Remove row</button>
    </td>
  </tr>
</tbody>
8 Validation and Error Messages
Most of our forms will need to show validation messages in order to inform the user of the errors he/she has made.
Thymeleaf offers some tools for this: a couple of functions in the #fields object, the th:errors and the th:errorclass attributes.
8.1 Field errors
Let’s see how we could set a specific CSS class to a field if it has an error:
<input type="text" th:field="*{datePlanted}"
                   th:class="${#fields.hasErrors('datePlanted')}? fieldError" />
As you can see, the #fields.hasErrors(...) function receives the field expression as a parameter (datePlanted), and returns a boolean telling whether any validation errors exist for that field.
We could also obtain all the errors for that field and iterate them:
<ul>
  <li th:each="err : ${#fields.errors('datePlanted')}" th:text="${err}" />
</ul>
Instead of iterating, we could have also used th:errors, a specialized attribute which builds a list with all the errors for the specified selector, separated by <br />:
<input type="text" th:field="*{datePlanted}" />
<p th:if="${#fields.hasErrors('datePlanted')}" th:errors="*{datePlanted}">Incorrect date</p>
Simplifying error-based CSS styling: th:errorclass
The example we saw above, setting a CSS class to a form input if that field has errors, is so common that Thymeleaf offers a specific attribute for doing exacly that: th:errorclass.
Applied to a form field tag (input, select, textarea…), it will read the name of the field to be examined from any existing name or th:field attributes in the same tag, and then append the specified CSS class to the tag if such field has any associated errors:
<input type="text" th:field="*{datePlanted}" class="small" th:errorclass="fieldError" />If datePlanted has errors, this will render as:
<input type="text" id="datePlanted" name="datePlanted" value="2013-01-01" class="small fieldError" />8.2 All errors
And what if we want to show all the errors in the form? We just need to query the #fields.hasErrors(...) and #fields.errors(...) methods with the '*' or 'all' constants (which are equivalent):
<ul th:if="${#fields.hasErrors('*')}">
  <li th:each="err : ${#fields.errors('*')}" th:text="${err}">Input is incorrect</li>
</ul>
As in the examples above, we could obtain all the errors and iterate them…
<ul>
  <li th:each="err : ${#fields.errors('*')}" th:text="${err}" />
</ul>
…as well as build a <br />-separated list:
<p th:if="${#fields.hasErrors('all')}" th:errors="*{all}">Incorrect date</p>Finally. Note #fields.hasErrors('*') is equivalent to #fields.hasAnyErrors() and #fields.errors('*') is equivalent to #fields.allErrors(). Use whichever syntax you prefer:
<div th:if="${#fields.hasAnyErrors()}">
  <p th:each="err : ${#fields.allErrors()}" th:text="${err}">...</p>
</div>
8.3 Global errors
There is a third type of error in a Spring form: global errors. These are errors that are not associated with any specific fields in the form, but still exist.
Thymeleaf offers the global constant for accessing these errors:
<ul th:if="${#fields.hasErrors('global')}">
  <li th:each="err : ${#fields.errors('global')}" th:text="${err}">Input is incorrect</li>
</ul>
<p th:if="${#fields.hasErrors('global')}" th:errors="*{global}">Incorrect date</p>…as well as equivalent #fields.hasGlobalErrors() and #fields.globalErrors() convenience methods:
<div th:if="${#fields.hasGlobalErrors()}">
  <p th:each="err : ${#fields.globalErrors()}" th:text="${err}">...</p>
</div>
8.4 Displaying errors outside forms
Form validation errors can also be displayed outside forms by using variable (${...}) instead of selection (*{...}) expressions and prefixing the name of the form-backing bean:
<div th:errors="${myForm}">...</div>
<div th:errors="${myForm.date}">...</div>
<div th:errors="${myForm.*}">...</div>

<div th:if="${#fields.hasErrors('${myForm}')}">...</div>
<div th:if="${#fields.hasErrors('${myForm.date}')}">...</div>
<div th:if="${#fields.hasErrors('${myForm.*}')}">...</div>

<form th:object="${myForm}">
    ...
</form>
8.5 Rich error objects
Thymeleaf offers the possibility to obtain form error information in the form of beans (instead of mere strings), with the fieldName (String), message (String) and global (boolean) attributes.
These errors can be obtained by means of the #fields.detailedErrors() utility method:
<ul>
    <li th:each="e : ${#fields.detailedErrors()}" th:class="${e.global}? globalerr : fielderr">
        <span th:text="${e.global}? '*' : ${e.fieldName}">The field name</span> |
        <span th:text="${e.message}">The error message</span>
    </li>
</ul>
9 It’s still a Prototype!
Our application is ready now. But let’s have a second look at the .html page we created…
One of the nicest consequences of working with Thymeleaf is that after all this functionality we have added to our HTML, we can still use it as a prototype (we say it is a Natural Template). Let’s open seedstartermng.html directly in our browser without executing our application:
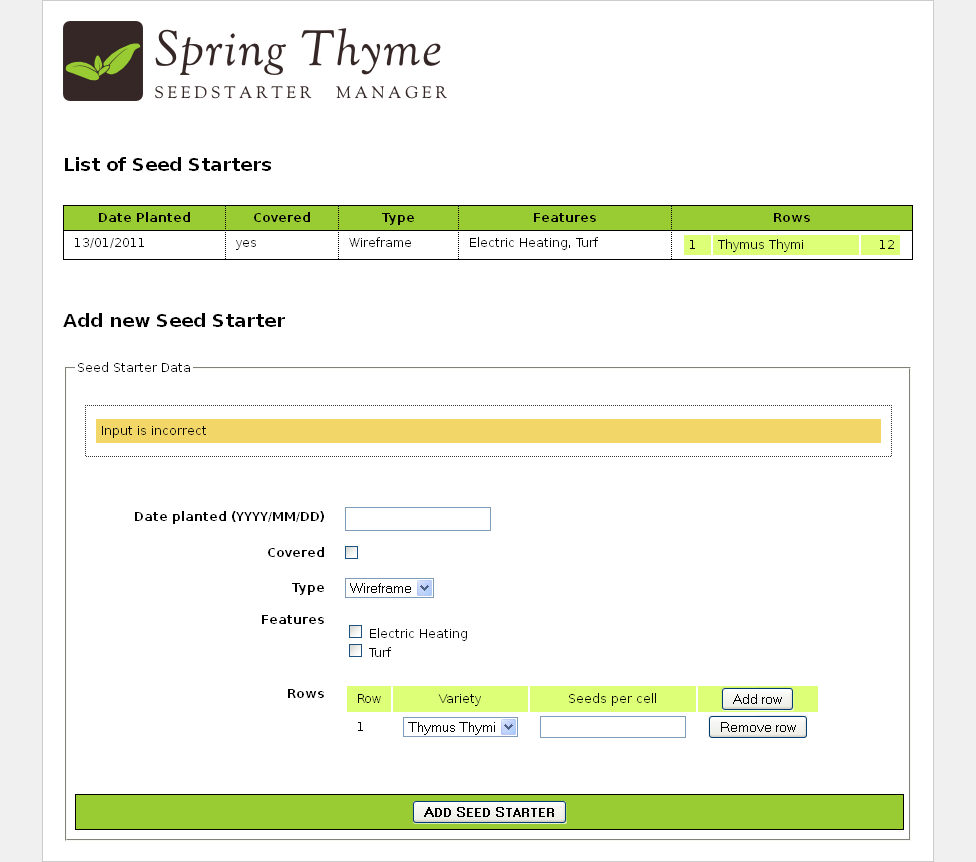
There it is! It’s not a working application, it’s not real data… but it is a perfectly valid prototype made up of perfectly displayable HTML code. Try to do that with JSP!
10 The Conversion Service
10.1 Configuration
As explained before, Thymeleaf can make use of a Conversion Service registered at the Application Context. Let’s see again what it looks like:
<?xml version="1.0" encoding="UTF-8"?>
<beans ...>

  ...
  <mvc:annotation-driven conversion-service="conversionService" />
  ...

  <!-- **************************************************************** -->
  <!--  CONVERSION SERVICE                                              -->
  <!--  Standard Spring formatting-enabled implementation               -->
  <!-- **************************************************************** -->
  <bean id="conversionService"
        class="org.springframework.format.support.FormattingConversionServiceFactoryBean">
    <property name="formatters">
      <set>
        <bean class="thymeleafexamples.stsm.web.conversion.VarietyFormatter" />
        <bean class="thymeleafexamples.stsm.web.conversion.DateFormatter" />
      </set>
    </property>
  </bean>

  ...

</beans>
10.1 Double-bracket syntax
The Conversion Service can be easily applied in order to convert/format any object into String. This is done by means of the double-bracket syntax:
- For variable expressions:
${{...}} - For selection expressions:
*{{...}}
So, for example, given an Integer-to-String converter that adds commas as a thousands separator, this:
<p th:text="${val}">...</p>
<p th:text="${{val}}">...</p>
…should result in:
<p>1234567890</p>
<p>1,234,567,890</p>
10.2 Use in forms
We saw before that every th:field attribute will always apply the conversion service, so this:
<input type="text" th:field="*{datePlanted}" />…is actually equivalent to:
<input type="text" th:field="*{{datePlanted}}" />Note that this is the only scenario in which the Conversion Service is applied in expressions using single-bracket syntax.
10.3 #conversions utility object
The #conversions expression utility object allows the manual execution of the Conversion Service wherever needed:
<p th:text="${'Val: ' + #conversions.convert(val,'String')}">...</p>Syntax for this utility object:
#conversions.convert(Object,Class): converts the object to the specified class.#conversions.convert(Object,String): same as above, but specifying the target class as a String (note thejava.lang.package can be ommitted).
11 Rendering Template Fragments
Thymeleaf offers the possibility to render only part of a template as the result of its execution: a fragment.
This can be a useful componentization tool. For example, it can be used at controllers that execute on AJAX calls, which might return markup fragments of a page that is already loaded at the browser (for updating a select, enabling/disabling buttons…).
Fragmentary rendering can be achieved by using Thymeleaf’s fragment specs: objects implementing the org.thymeleaf.fragment.IFragmentSpec interface.
The most common of these implementations is org.thymeleaf.standard.fragment.StandardDOMSelectorFragmentSpec, which allows specifying a fragment using a DOM Selector exactly like the ones used at th:include or th:replace.
11.1 Specifying fragments in view beans
View beans are beans of the org.thymeleaf.spring4.view.ThymeleafView class declared at the application context. They allow the specification of fragments like this:
<bean name="content-part" class="org.thymeleaf.spring4.view.ThymeleafView">
  <property name="templateName" value="index" />
  <property name="fragmentSpec">
    <bean class="org.thymeleaf.standard.fragment.StandardDOMSelectorFragmentSpec"
          c:selectorExpression="content" />
  </property>
</bean>
Given the above bean definition, if our controller returns content-part (the name of the above bean)…
@RequestMapping("/showContentPart")
public String showContentPart() {
    ...
    return "content-part";
}
…thymeleaf will return only the content fragment of the index template – which location will probably be something like /WEB-INF/templates/index.html, once prefix and suffix are applied:
<!DOCTYPE html>
<html>
  ...
  <body>
    ...
    <div th:fragment="content">
      Only this will be rendered!!
    </div>
    ...
  </body>
</html>
Note also that, thanks to the power of Thymeleaf DOM Selectors, we could select a fragment in a template without needing any th:fragment attributes at all. Let’s use the id attribute, for example:
<bean name="content-part" class="org.thymeleaf.spring4.view.ThymeleafView">
  <property name="fragmentSpec">
    <bean class="org.thymeleaf.standard.fragment.StandardDOMSelectorFragmentSpec"
          c:selectorExpression="#content" />
  </property>
  <property name="templateName" value="index" />
</bean>
…which will perfectly select:
<!DOCTYPE html>
<html>
  ...
  <body>
    ...
    <div id="content">
      Only this will be rendered!!
    </div>
    ...
  </body>
</html>
11.2 Specifying fragments in controller return values
Instead of declaring view beans, fragments can be specified from the controllers themselves by using the same syntax as in th:include or th:replace attributes:
@RequestMapping("/showContentPart")
public String showContentPart() {
    ...
    return "index :: content";
}
Of course, again the full power of DOM Selectors is available, so we could select our fragment based on standard HTML attributes, like id="content":
@RequestMapping("/showContentPart")
public String showContentPart() {
    ...
    return "index :: #content";
}
And we can also use parameters, like:
@RequestMapping("/showContentPart")
public String showContentPart() {
    ...
    return "index :: #content ('myvalue')";
}
12 Advanced Integration Features
12.1 Integration with RequestDataValueProcessor
Thymeleaf now seamlessly integrates with Spring’s RequestDataValueProcessor interface. This interface allows the interception of link URLs, form URLs and form field values before they are written to the markup result, as well as transparently adding hidden form fields that enable security features like e.g. protection agains CSRF (Cross-Site Request Forgery).
An implementation of RequestDataValueProcessor can be easily configured at the Application Context:
<?xml version="1.0" encoding="UTF-8"?>
<beans xmlns="http://www.springframework.org/schema/beans"
       xmlns:xsi="http://www.w3.org/2001/XMLSchema-instance"
       xsi:schemaLocation="http://www.springframework.org/schema/beans
                     http://www.springframework.org/schema/beans/spring-beans-3.1.xsd">

    ...

    <bean name="requestDataValueProcessor"
          class="net.example.requestdata.processor.MyRequestDataValueProcessor" />

</beans>
…and Thymeleaf uses it this way:
th:hrefandth:srccallRequestDataValueProcessor.processUrl(...)before rendering the URL.th:actioncallsRequestDataValueProcessor.processAction(...)before rendering the form’sactionattribute, and additionally it detects when this attribute is being applied on a<form>tag —which should be the only place, anyway—, and in such case callsRequestDataValueProcessor.getExtraHiddenFields(...)and adds the returned hidden fields just before the closing</form>tag.th:valuecallsRequestDataValueProcessor.processFormFieldValue(...)for rendering the value it refers to, unless there is ath:fieldpresent in the same tag (in which caseth:fieldwill take care).th:fieldcallsRequestDataValueProcessor.processFormFieldValue(...)for rendering the value of the field it applies to (or the tag body if it is a<textarea>).
Note this feature will only be available for Spring versions 3.1 and newer.
12.1 Building URIs to controllers
Since version 4.1, Spring allows the possibility to build links to annotated controllers directly from views, without the need to know the URIs these controllers are mapped to.
In Thymeleaf, this can be achieved by means of the #mvc.url(...) expression method, which allows the specification of controller methods by the capital letters of the controller class they are in, followed by the name of the method itself. This is equivalent to JSP’s spring:mvcUrl(...) custom function.
For example, for:
public class ExampleController {

    @RequestMapping("/data")
    public String getData(Model model) { ... return "template" }

    @RequestMapping("/data")
    public String getDataParam(@RequestParam String type) { ... return "template" }

}
The following code will create a link to it:
<a th:href="${(#mvc.url('EC#getData')).build()}">Get Data Param</a>
<a th:href="${(#mvc.url('EC#getDataParam').arg(0,'internal')).build()}">Get Data Param</a>
You can read more about this mechanism at http://docs.spring.io/spring-framework/docs/4.1.2.RELEASE/spring-framework-reference/html/mvc.html#mvc-links-to-controllers-from-views
13 Spring WebFlow integration
13.1 Basic configuration
The thymeleaf-spring4 integration package includes integration with Spring WebFlow 2.3.x.
WebFlow includes some AJAX capabilities for rendering fragments of the displayed page when specific events (transitions) are triggered, and in order to enable Thymeleaf to attend these AJAX requests, we will have to use a different ViewResolver implementation, configured like this:
<bean id="thymeleafViewResolver" class="org.thymeleaf.spring4.view.AjaxThymeleafViewResolver">
    <property name="viewClass" value="org.thymeleaf.spring4.view.FlowAjaxThymeleafView" />
    <property name="templateEngine" ref="templateEngine" />
</bean>
…and then this ViewResolver can be configured at your WebFlow ViewFactoryCreator like:
<bean id="mvcViewFactoryCreator"
      class="org.springframework.webflow.mvc.builder.MvcViewFactoryCreator">
    <property name="viewResolvers" ref="thymeleafViewResolver"/>
</bean>
From here on, you can specify Thymeleaf templates in your view-state’s:
<view-state id="detail" view="bookingDetail">
    ...
</view-state>
In the above example, bookingDetail is a Thymeleaf template specified in the usual way, understandable by any of the Template Resolvers configured at the TemplateEngine.
13.2 Ajax fragments
WebFlow allows the specification of fragments to be rendered via AJAX with <render> tags, like this:
<view-state id="detail" view="bookingDetail">
    <transition on="updateData">
        <render fragments="hoteldata"/>
    </transition>
</view-state>
These fragments (hoteldata, in this case) can be a comma-separated list of fragments specified at the markup with th:fragment:
<div id="data" th:fragment="hoteldata">
    This is a content to be changed
</div>
Always remember that the specified fragments must have an id attribute, so that the Spring JavaScript libraries running on the browser are capable of substituting the markup.
<render> tags can also be specified using DOM selectors:
<view-state id="detail" view="bookingDetail">
    <transition on="updateData">
        <render fragments="[//div[@id='data']]"/>
    </transition>
</view-state>
…and this will mean no th:fragment is needed:
<div id="data">
    This is a content to be changed
</div>
As for the code that triggers the updateData transition, it looks like:
<script type="text/javascript" th:src="@{/resources/dojo/dojo.js}"></script>
<script type="text/javascript" th:src="@{/resources/spring/Spring.js}"></script>
<script type="text/javascript" th:src="@{/resources/spring/Spring-Dojo.js}"></script>

  ...

<form id="triggerform" method="post" action="">
    <input type="submit" id="doUpdate" name="_eventId_updateData" value="Update now!" />
</form>

<script type="text/javascript">
    Spring.addDecoration(
        new Spring.AjaxEventDecoration({formId:'triggerform',elementId:'doUpdate',event:'onclick'}));
</script>